Friday, 29 March 2013

Free GPRS In Airtel Trick

Leave a Comment
AIRTEL Free GPRS Real Host Trick March 2013
Hello Dear Friend's,
I Hope You Are Daily Visiting Mahey Computer Tricks For Latset Mobile Tricks.

Today I Am Again Back With Latest Airtel Free GPRS Trick.

Follow Below Instructions:-
  • Make Airtel "Mobile Office" As Your Default Setting In Your Mobile
  • Open UCWEB Handler
  • Make Changes In Your Real Host As Mentioned Below:-
  • airtellive.com OR live.airtelworld.com OR 103.15.227.45
  • Now Save This Settings And Restart Your Mobile.
Note:- Use This Trick @ Low Balance,
Don't Forget To Like Us On Facebook.
Read More...

Wednesday, 27 March 2013

Watch Live TV channels streams with VLC media player

1 comment
If you’re wondering how to watch live TV using VLC, here is a useful list. It’s a short list as you’ll see, but as you probably already know, is hard to find a lot of live TV channels streams, all working. Some of these streams are buffering like MTV’s streams or Fox News and Discovery Science stream.
You can download my Live TV Streams List and play it with VLC or you can open it with notepad and change the order of TV channels or even delete from the list what you don’t want. If you want to edit the file just pay closer attention to do not mess it up :)
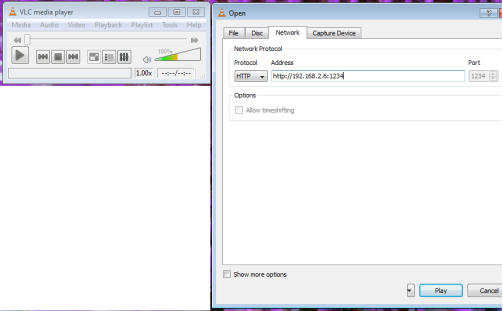
If you want to play individual TV channels, copy the TV stream URL, click on Media tab and then Open Network and fill in the URL of the stream in the address field and click play.
Stream protocols you can play in VLC:
RTSP – Real Time Streaming Protocol
MMS – Microsoft Media Server.
URL – Uniform Resource Locator (URL)
The TV streams I have been included into my list:
MSNBC News Channel (Live TV stream) – rtsp://dssushi.mobitv.com:554/39f28/1-EVDOQVGA.sdp
Discovery Science (Live TV stream) – rtsp://dssushi.mobitv.com:554/39f28/3-EVDOQVGA.sdp
NRJ Pure Music (Live TV stream) – mms://vipnrj.yacast.net/nrj_tvhit
USA DeeJayTV (Live TV stream) – mms://live.mediaserver.kataweb.it/deejaytv?MSWMExt=.asf
Music Box UK (Live TV stream) – mms://81.89.49.210/musicbox
MTV (Live TV stream) – http://87.239.230.9:8001
MTV Dance (Live TV stream) – http://87.239.230.9:8000
If you know other live TV streams, working with VLC, please share ;) Thanks!
UPDATE. Here a new list with British Live TV channels. Many thanks to myp2pforum.eu.
Hint: It seams that is better if these TV channels are played one by one, not into a play-list. My recommendation is to extract the URLs from these 2 lists and play them separately in VLC (CTRL+N).
Pass ccna security certification on first attempt by using certified ccna voice questions and ccna practice test.
Read More...

Howto stream Live TV Channel / Local File over the Network using VLC GUI n CLI and view it via browser/player!

1 comment
  
Following is a quick guide on Howto broadcast local media File OR LIVE TV Channel using TV Tunner Card over the network using VLC media player, and this streaming can be viewed at client pc either via VLC media player or Firefox Web Browser.

REQUIREMENTS:

For Server Mode:
1) Any Windows Operating System like XP / 2003 / Win7
2) TV Tunner Card (For TV Channel) (I used DANNY’s TV card)
OR
3) Local Media Files like Videos MV / FLV /DAT file(s)
For Clients Mode:
1) VLC Media Player OR
2) Firefox Web Browser (First install FIREFOX then install VLC in FULL mode)

Section # 1 : LOCAL MEDIAL FILE STREAMING

1 #)  SERVER SIDE CONFIGURATION:  [GUI method]
First install VLC Media plyer. [I used 0.98a version in this example].
Open VLC Media Player,
Goto Media > Streaming ,
Now select your desired file and click on Stream button.
See the attached picture.
Now a new window will open and it will give you many option to choose.
# First in OUTPUT options, select HTTP, in address bar type your system Local ip , in my case its 192.168.2.6 and in port, type any available port, I used 1234.
# Now in Profile section, we will use ready made profile name “Windows (wmv/asf).
That’s it. Now hit the STREAM button, and it will start streaming the file over the network.
See the image below.


2#  SERVER SIDE CONFIGURATION  [CLI Mode]

You can also stream any file using CLI method which is quick (once you get familiar with the idea how streaming works in GUI), its also useful to make batch scripts if you want start Streaming automatically when the system restarts.
CLI for Local File:

C:\Program Files\VideoLAN\VLC>vlc.exe -vvv c:\vdo.dat :sout=#transcode{vcodec=WMV2,vb=800,scale=1,acodec=wma,ab=128,channels=2}:duplicate{dst=std{access=http,mux=asf,dst=192.168.2.6:1234
CLI for TV TUNNER CARD:
vlc -vvv dshow:// :dshow-vdev="713x BDA Analog Capture" :dshow-adev="" :sout=#transcode{vcodec=WMV2,vb=800,scale=1,acodec=wma2,ab=128,channels=2,samplerate=44100}:duplicate{dst=http{mux=asf,dst=:1234/},dst=display} :no-sout-rtp-sap :no-sout-standard-sap :ttl=1 :sout-keep
 To Add Logo in Streaming:

out=#transcode{vcodecvlc -vvv --logo-file C:\aa.jpg dshow:// :dshow-vdev="713x BDA Analog Capture" :dshow-adev="":s=WMV2,vb=800,scale=1,acodec=wma,ab=128,channels=2,sfilter=logo}:duplicate{dst=display,dst=std{access=http,mux=asf,dst=>192.168.2.6:1234


HOWTO STREAM Video via  HTTP method:

Open Notepad, and paste the following text.
(For some reasons, html code doesn’t show properly on wordpress BLOGs, So please copy the raw code from following pastebin link:
http://pastebin.com/d9SnHpjy

  1. <html>
  2. <head><title>Live TV Channel Stream Testing aacable@hotmail.com</title>
  3. <meta name="description" content="Live TV Channel Stream Testing Template By aacable@hotmail.com">
  4. </head>
  5. <body bgcolor="#000000">
  6. <h1 align="center"><font color="#FF0000">Live TV Channel Stream Testing<br>
  7. </font><blink><font size="4" color="#FFFF00">Template By
  8. </font><font color="#00FF00" size="2">SYED JAHANZAIB </font>
  9. <font size="4" color="#00FF00">
  10. <a href="mailto:aacable@hotmail.com"><font color="#FFFF00">aacable@hotmail.com</font></a></font></blink></h1>
  11. <p align="center"><font color="#FF0000">
  12. <embed type="application/x-vlc-plugin"
  13. name="tv"
  14. autoplay="yes" loop="no" hidden="no" width="640" height="480"
  15. target="http://192.168.2.6:1234" />
  16. <br />
  17. &nbsp;</font></p>
  18. </body>
  19. </html>
Now SAVE this file as tv.html , Open it in FIREFOXand it will automatically start playing the streaming file. You can also copy it to your IIS web server root folder e.g c:\inetpub\wwwroot so any of your client can view it via there browser pointing to your webserver e.g  http://192.168.2.6/tv.html
=x=x=x=x=x=x=x=x=x=x=x=x=x=x=x=x=x=x=x=x=x=x=x=x=x=x=x

Howto View Streaming Video from Client Side using VLC

First install VLC Media Player on client computer, then Open VLC media player,
Goto Media > Open Network and type http://192.168.2.6:1234 and hit enter,it will start playing the streaming video. See the attached picture.


Howto View Streaming Video from Client Side using Firefox Web Browser:

Open Firefox Browser and type
Sample Output:

# How to change the channel Which is broadcasting . . .

There are couple of options and controls that you can provide to your users. VLC is very advance and powerful application for all sorts of multimedia needs. Just dig more n more n you will find the solution. You can even create IPTV base project  in VLC or simply create Video On Deman VOD which is very easy.
First Open the Tv Tunner viewer and tune all the channels using auto scanning. Then view any channel of your choice, now close the viewer application. Now If you start broadcasting the channel using VLC, it will by default stream the channel that you last viewed by the TV Tunner viewer application.

Read More...

Tuesday, 26 March 2013

Google Breadcrumb for Blogger

Leave a Comment
The Google Search Result Snippet is the main thing that helps users decide whether your page is relevant to their search or not. The snippet which gets displayed is generated using Google’s algorithms. But you can assist Google in generating a meaningful Snippet. This can be done using structured microdata, microformat or RDFa markups.
Breadcrumbs are useful navigational trails displayed on Google if you have added the breadcrumb markup to your Blog.
Here is a Screenshot of breadcrumbs in Google Search : (Note the area marked with the yellow rectangle)The Google Search Result Snippet is the main thing that helps users decide whether your page is relevant to their search or not. The snippet which gets displayed is generated using Google’s algorithms. But you can assist Google in generating a meaningful Snippet. This can be done using structured microdata, microformat or RDFa markups.
Breadcrumbs are useful navigational trails displayed on Google if you have added the breadcrumb markup to your Blog.
Here is a Screenshot of breadcrumbs in Google Search : (Note the area marked with the yellow rectangle)
Google Breadcrumb for Blogger
Google gets this breadcrumb information from the structured HTML content in your webpage. Adding these markups doesn’t guarantee that your Blog results will always have the breadcrumbs, but it is likely to be displayed in Google Search Pages.

How can I add the Google Breadcrumb Markup to Blogger?

If you have been following this blog for long, you might have read my previous post on breadcrumbs. I have updated all codes in that post so that it uses RDFa breadcrumb markup. For Blogger, these markup tags would be useful only on Post pages, and hence the code handles just that. So you just have to go there and follow the tutorial. If you are already using breadcrumbs on your blog(using my old tutorial or other versions of that on the internet), then you will have to remove it first before following the updated breadcrumb tutorial.
Tutorial Link: Adding Google Breadcrumb Markup to Blogger
Once done, you can test the markup using Google’s Rich Snippets Testing Tool. I too have added the same markup to my blog(just before making this post).
Google Has provided both microdata and RDFa markup samples for breadcrumbs. My tutorial uses the RDFa format, at it looks less cluttered than the other one. The markup will use the last label for the post as it’s tag. It will omit the rest of the labels while generating the breadcrumb.
If you have any questions, or if you got to see the breadcrumbs for your blog on Google Search, do comment and let us know.
Google Breadcrumb for Blogger
Google gets this breadcrumb information from the structured HTML content in your webpage. Adding these markups doesn’t guarantee that your Blog results will always have the breadcrumbs, but it is likely to be displayed in Google Search Pages.

How can I add the Google Breadcrumb Markup to Blogger?

If you have been following this blog for long, you might have read my previous post on breadcrumbs. I have updated all codes in that post so that it uses RDFa breadcrumb markup. For Blogger, these markup tags would be useful only on Post pages, and hence the code handles just that. So you just have to go there and follow the tutorial. If you are already using breadcrumbs on your blog(using my old tutorial or other versions of that on the internet), then you will have to remove it first before following the updated breadcrumb tutorial.
Tutorial Link: Adding Google Breadcrumb Markup to Blogger
Once done, you can test the markup using Google’s Rich Snippets Testing Tool. I too have added the same markup to my blog(just before making this post).
Google Has provided both microdata and RDFa markup samples for breadcrumbs. My tutorial uses the RDFa format, at it looks less cluttered than the other one. The markup will use the last label for the post as it’s tag. It will omit the rest of the labels while generating the breadcrumb.
If you have any questions, or if you got to see the breadcrumbs for your blog on Google Search, do comment and let us know.
Read More...

Google Breadcrumb for Blogger

Leave a Comment
The Google Search Result Snippet is the main thing that helps users decide whether your page is relevant to their search or not. The snippet which gets displayed is generated using Google’s algorithms. But you can assist Google in generating a meaningful Snippet. This can be done using structured microdata, microformat or RDFa markups.
Breadcrumbs are useful navigational trails displayed on Google if you have added the breadcrumb markup to your Blog.
Here is a Screenshot of breadcrumbs in Google Search : (Note the area marked with the yellow rectangle)
Google Breadcrumb for Blogger
Google gets this breadcrumb information from the structured HTML content in your webpage. Adding these markups doesn’t guarantee that your Blog results will always have the breadcrumbs, but it is likely to be displayed in Google Search Pages.

How can I add the Google Breadcrumb Markup to Blogger?

If you have been following this blog for long, you might have read my previous post on breadcrumbs. I have updated all codes in that post so that it uses RDFa breadcrumb markup. For Blogger, these markup tags would be useful only on Post pages, and hence the code handles just that. So you just have to go there and follow the tutorial. If you are already using breadcrumbs on your blog(using my old tutorial or other versions of that on the internet), then you will have to remove it first before following the updated breadcrumb tutorial.
Tutorial Link: Adding Google Breadcrumb Markup to Blogger
Once done, you can test the markup using Google’s Rich Snippets Testing Tool. I too have added the same markup to my blog(just before making this post).
Google Has provided both microdata and RDFa markup samples for breadcrumbs. My tutorial uses the RDFa format, at it looks less cluttered than the other one. The markup will use the last label for the post as it’s tag. It will omit the rest of the labels while generating the breadcrumb.
If you have any questions, or if you got to see the breadcrumbs for your blog on Google Search, do comment and let us know.
Read More...

Review Markup For Blogger

Leave a Comment
Lately I have been posting about different Rich Text markups which can help Google in displaying your Blog beautifully on Google Search Pages. Here is another one which would be useful to people who write review products like Gadgets, Movies, Games etc. This won’t be useful to any one else out there :P
Here is a screenshot of how the Review data would appear on Google Search Results
Review Markup For Blogger
The Search Snippet will display the rating provided  by the author along with the name of the author and the date on which he made the review. Google picks up this Data from the Rich Text Markups that you add to your Review Post. This kind of a review is termed as individual review or you can call it as the post author’s review The aggregate review based on user feedback is not yet possible on Blogger as blogger doesn’t have a proper mechanism to collect feedbacks from the readers.
This is the minimal(not exactly) Markup required to display review information in Google Search.
<div class="hreview">
 <span class="item">
 <span class="fn">Name of the Product you are reviewing</span><br/>
 </span>
 Reviewed by <span class="reviewer">Your Name</span>
on <span class="dtreviewed"> Jan 6 2012<span title="2012-01-06" class="value-title">
</span><br/>
 </span>
 Rating: <span class="rating">4.5</span>
</div>
Paste this snippet to the end of your Review Post after editing it properly.To paste this snippet you will have to switch to the HTML mode of the Blogger Post Editor. Also make sure that you have added a jump break in your post somewhere before this review snippet.This step is important and if you miss this, it will lead to multiple reviews on the same page.  The data in red should be edited and I think all of it is pretty much self explanatory. The rating can be provided out of 5. Once you publish the post, you can see a preview of the Review Snippet by using the Google Rich Snippets Testing tool.
Note: If you are using different Rich Text markups, all of them one be displayed on Google at once. So you have to choose based on the  data that you would want to be displayed on Google Search. You can play around with the Snippet Testing tool and customize it in the way you like it to be displayed.
Adding this markup doesn’t guarantee that the Review data will be displayed on Google. But it is most likely that it would be displayed provided  you have a quality blog. :)
Read More...

Threaded Comments For Blogger

1 comment
Blogger has just announced the much awaited feature "Threaded Comments For Blogger" and you might have already seen it on your Blog if you are using a default Blogger Template. If you are using your own custom Template, then you will have to tweak your template for the threaded comments to appear.
This is how the Threaded Comments will look like (Screen shot taken form the Official Blogger Buzz Blog)
single level thread on blogger

How to get the Threaded Comments ?

1. Make sure that you have enabled Comment Feeds
2. Use the Embedded Comment Form.
3. Now If you are not seeing the Threaded Comments, then it means that you have a customized template.
There are different methods to fix this. But before doing any of those download a backup of your Template.
On the Old UI, you can get a backup at option in Design > Edit HTML > Download Full Template
threaded comments in blogger
If you are using the New UI, then you can find the same at Template > Backup/Restore (Right Side) > Download full Template
threaded comments in blogger

Tweaks to get the Threaded Comments:

1. The simplest method is to reset each of your Widgets to default. Doing this will revert back any customization which you or the template designer has made to the Widgets.
You can reset the widgets by going to the Edit HTML page, and clicking on the link which says “Revert widget templates to default” . If you tried this and lost your Customizations, you can always get them back by re-uploading your Template using the Backup/Restore option
2. If you don’t want to reset the widget templates, then you will have to manually Edit your template.
Find each occurrence of this snippet
<b:include data='post' name='comments'/>
and replace it with
<b:if cond='data:post.showThreadedComments'>
<b:include data='post' name='threaded_comments'/>
<b:else/>
<b:include data='post' name='comments'/>
</b:if>
and you should probably see the threaded view on your blog. If that too doesn’t help leave a comment here and we will try to debug it together :-)
Read More...

Fix: Wrong Description and Image on sharing posts to Facebook

Leave a Comment
When you share a post on Facebook, it will display a thumbnail picked from the post page along with a short description of the post. But in many cases Facebook fails to  identify the correct image and description that it should use. This leads to irrelevant images and description coming up in Facebook when you or your readers share the post. This is totally annoying, and I had got many queries regarding this on my Facebook page and via email. So for those who are trying to figure a way out of this, here is the solution.

Which image and Description does Facebook pick from your Post Page

Facebook regularly scrapes your page and caches the data to your servers. They look for meta data information(Opengraph tags and others) in your post page. The meta data can explicitly specify the image and the description to use when the page is shared.If Facebook doesn’t find any meta data, then their Algorithms will fetch some description and image from your Page. Facebook shows a wrong description or image when their Algorithms are not able to fetch the correct image and description from your Post Page.
We will solve both of these issues using two different techniques.

1. Fixing the Wrong Image Problem.

You might have noticed that comment avatars, and other  irrelevant images come up when you share the post on Facebook . The solution to this is to specify the image in the page meta data. We will be using open graph tags for the same.
Go to Template > Edit HTML and just above
</head>
Paste the following code snippet.
<b:if cond='data:blog.postImageThumbnailUrl'>
<meta expr:content='data:blog.postImageThumbnailUrl' property='og:image'/>
<b:else/>
<meta content='https://blogger.googleusercontent.com/img/b/R29vZ2xl/AVvXsEjpTE54ODHF7fm_7_XPFYQCKdELZksFJO5fJE3bpUwj2yVnq-Fh0g9b9U_t4jOuAcB9fiHgUMA2eCWrCjxOpZC4ddzidg1kjrF0Iy9wUnGJBJ3bPPZaaHOem7K2hMx_1MZi2Adrm8wT8RE/s72-c/default.png' property='og:image'/>
</b:if>
You can alter the image URL in the above snippet. That image will be used when no post thumbnail is present.
Now when you share posts to Facebook, a proper post thumbnail will be displayed. If the post doesn’t have images, then the fall back image which we have specified in the snippet will be used. If you don’t see results right away , then it is because of the caching done by Facebook. You can force Facebook to update the cache by debugging the post URL using this tool.

2. Fixing the Wrong Description Problem

Wrong description comes up when Facebook is not able to recognize the content and structure of your page. This also can be rectified by using meta data, but since blogger doesn’t provide a post snippet tag outside the blog post widget, it is impossible to do that using valid HTML. So we will have to go for other alternatives. If meta data is not found, then Facebook normally uses the First paragraph in your page(which is big enough). So it will be a good idea to get used to the paragraph HTML tag <p>content</p>. The Blogger Post Editor doesn’t use paragraph tags but uses lots of line break tags instead. So if you are using the Blogger Post Editor, then you will have to go into the HTML mode of the post Editor, and make sure that you use paragraph tags(I do agree that it is a difficult thing to do). If you can’t take that headache, then you can use a third party Publishing Tool like the Windows Live Writer which has superior Editing Controls. After doing this, you will again have to force a Cache refresh using the Facebook Debug tool and your post should show a proper description on Facebook.

3. Scripts coming up in the Facebook Description

I had seen a couple of cases where JavaScript snippets come up in the Facebook Description. Facebook somehow mistook the script for content, and this is probably because of the way you have added the script. Go to your template and see if there are any special characters in front of that particular script tag. If you find one, then remove it, and force a Facebook Cache Refresh.
If you found this tutorial useful, then do share it with your Facebook Friends who use Blogger :-). If you have any questions do ask here in the comments or the forum or on our Facebook Page.
Read More...

Get Plus One Count in your Blogger Dashboard

Leave a Comment
Get Plus One Count in your DashboardBlogger has been devising new methods for tightly integrating it’s new Social Network with Blogger. They have now released yet another Google Plus integration feature. If you are using the New Dashboard, you might have already noticed the change.
Blogger has added a Plus one Counter(not the regular count button that you see on numerous web pages) to the Blogger dashboard, which gives the author some information about how the post is being received on the Social Network . It displays a count of how many times the post has been shared on G+ . If you click on the count it will show a list of users who have +1 ed your post. These Counts are available only in the New Interface. So if you haven’t made the switch yet, it might be a good time to make a move.
plus one count in your blogger dashboard

who plus oned your blogger post
This gives you a quick idea of the Social reaction to your Blog Posts.You can easily find out which posts of yours are most popular on Google +.
Read More...

Custom 404 Error Pages for Blogger

Leave a Comment
The 404 or Not Found error message is a HTTP standard response code indicating that the client was able to communicate with the server, but the server could not find what was requested." In simple words the page that will be displayed when the actual page is not found is called a 404 Error Page. Till now Blogger’s error page was a plain old design with more of orange in it and was not customizable. Now Blogger Error pages use the same template . This would help template designers in making up custom 404 Pages.This tutorial will help you in setting up a Custom 404 page for your Blog. By Default, your Blogger Error page will display this error message
custom 404 page for blogger
You can Change this message to something else from the Blogger Settings.
The option is there at Settings > Search preferences > Custom Page not Found
blogger-custom-404-message
If you want more than just a message, then we will have to fill up this text area with some HTML Code.. This is how my Error page Looks like

Instructions

  1. Login to your Blogger account and go to the Template page and proceed to Edit HTML
  2. Click on the Expand Widget Templates Check box so that your entire template comes up
  3. Now Look for </head> and immediately before that paste this snippet
    <b:if cond='data:blog.pageType == "error_page"'>
    <style type="text/css">
    .status-msg-wrap {
        font-size: 100%;
        margin: none;
        position: static;
        width: 100%;
    }
    .status-msg-border {
        display:none
    }
    .status-msg-body {
        padding: none;
        position: static;
        text-align: inherit;
        width: 100%;
        z-index: auto;
    }
    .status-msg-wrap a {
        padding: none;
        text-decoration: inherit;
    }
    </style>
    </b:if>
    This code snippet will reset the default styling given to the Blogger Message Wrapper.
  4. Save the template and go to a page on your blog which doesn’t exist.
  5. You should be able to see the change now. The grey background and the border around the 404 status message would no longer be there.
  6. Now Let’s see how we can improve the look and feel of our 404 page. I would suggest you to use inline CSS styles to improve the look and Feel of your 404 message.Here is a sample HTML template which you can paste into the text box at Search preferences > Custom Page not Found.
    <h3>Your requested page was not found</h3>
    <p>Sorry, we cannot find the page that you are looking for. It might have been removed, had its name changed, or is temporarily unavailable.<br/>
    Please check that the Web site address is spelled correctly.</p>
    <b>Other things to try:</b><br/>
    <ul>
    <li>Go to our <a href="/">home page</a>, and use the menus or links to navigate to a specific post.</li>
    <li>
    <form method="get" action="/search">
    <table width="100%">
    <tr>
    <td><input type="text" style="width:95%;padding:2px;" value="Search this blog.." onfocus="if (this.value == &quot;Search this blog..&quot;) {this.value = &quot;&quot;}" onblur="if (this.value == &quot;&quot;) {this.value = &quot;Search this blog...&quot;;}" name="q"></td>
    <td><input type="button" Value="Search"></td>
    </tr>
    </table>
    </form>
    </li>
    </ul>
  7. It will give you something similar to my 404 page.
  8. If you are creative, you can add more stuff to the 404 pages. You can find a list of really creative 404 pages on HongKiat for inspiration

Detecting an Error Page

Blogger has introduced a new page type called "error_page" and you can detect it using b:if conditional tags.
The following condition checks if a page is an error page or not.
<b:if cond='data:blog.pageType == "error_page"'>
This is an Error Page
</b:if>

Changing the Error Page Title

By default the title of the Blogger Error Page is your Blog Title. If you want to change it to something else, you can Edit your template and change
<title><data:blog.pageTitle/></title>
to
<b:if cond='data:blog.pageType == "error_page"'>
<title>Page Not Found</title>
<b:else/>
<title><data:blog.pageTitle/></title>
</b:if>
If you are using my Title Tag Hack or derivatives of that available on the internet, then you will have to change
<!-- Start www.bloggerplugins.org: Changing the Blogger Title Tag -->
<b:if cond='data:blog.url == data:blog.homepageUrl'>
<title><data:blog.pageTitle/></title>
<b:else/>
<title><data:blog.pageName/><b:if cond='data:blog.pageName'> - </b:if><data:blog.title/></title>
</b:if>
<!-- End www.bloggerplugins.org: Changing the Blogger Title Tag –>
to
<!-- Start www.bloggerplugins.org: Changing the Blogger Title Tag -->
<b:if cond='data:blog.url == data:blog.homepageUrl'>
<title><data:blog.pageTitle/></title>
<b:else/>
<b:if cond='data:blog.pageType == "error_page"'>
<title>Page Not Found</title>
<b:else/>
<title><data:blog.pageName/><b:if cond='data:blog.pageName'> - </b:if><data:blog.title/></title>
</b:if>
</b:if>
<!-- End www.bloggerplugins.org: Changing the Blogger Title Tag –>
Read More...

Custom Permalinks for Blogger Posts

Leave a Comment
A permalink (or permanent link) is a URL that points to a specific blog entry after it has passed from the front page to the archives.Blogger generates this permanent link based on your post title(If the title is in English). For example if your post title is “Hello World”, the blog post’s permalink would be something like http://yourblog.blogspot.com/2012/06/hello-world.html   Till date Blogger never allowed the user to control what the permalink should be but it rather assigned a permalink on it’s own. This has now changed and Blogger now allows YOU to decide what the permalink of your new post should be.
This feature is currently available in Blogger’s Draft Version. So if you would like to check it out, head straight over to http://draft.blogger.com and create a new post. In the post options you will see a permalink option.
image
If you select the “Automatic URL” (the default option), then Blogger will generate the permalink on it’s own. If you want to specify a custom URL, opt for the “Custom URL” option and you can enter your custom post permalink over there. It will allow you to enter alphabets, hyphens and underscores. It will just ignore underscores. So I just used a combination of hyphens and alphabets to create my post permalink
image

The Final Permalink will be something like
http://yourblogaddress/yyyy/mm/the custom URL that you specified
In my case it came to something like
http://myblog.blogspot.com/yyyy/mm/custom-permanent-link.html
Blogger doesn’t allow you to modify the Permalinks of old posts but you can make use of this new feature on your new posts  There seems to be no limit to the length of this Custom URL at the moment but Blogger might impose some length limit in future.
Read More...

Tuesday, 10 July 2012

Add Floating Facebook Like Box Widget To Blogger !

Leave a Comment
  1. Go to Design > Page Elements.
  2. Click Add A Gadget.
  3. In Add A Gadget window, select the HTML/Javascript .
  4. Paste the following code inside it,
 -----------------------------------------------------------------------------------
<script type="text/javascript">
 /*<![CDATA[*/
 jQuery(document).ready(function() {jQuery(".abtlikebox").hover(function()
 {jQuery(this).stop().animate({right: "0"}, "medium");}, function() {jQuery(this)
.stop().animate({right: "-250"}, "medium");}, 500);});
 /*]]>*/
 </script>
 <style type="text/css">
 .abtlikebox{background: url("http://4.bp.blogspot.com/
-mMtB2ANqowQ/T6es-PuSR2I/AAAAAAAAAjM/LDamrUnMJJc/s320/fb1-right.png")
 no-repeat scroll left center transparent !important; float: right;height:
 270px;padding: 0 5px 0 46px;width: 245px;z-index:  99999;position:fixed;
right:-250px;top:20%;}.abtlikebox div{ padding: 0; margin-right:-8px;
 border:4px solid  #3b5998; background:#fafafa;}
.abtlikebox span{bottom: 4px;font: 8px "lucida grande",tahoma,verdana,
arial,sans-serif;position: absolute;right: 6px;text-align: right;z-index: 99999;}
 .abtlikebox span a{color: gray;text-decoration:none;}
 .abtlikebox span a:hover{text-decoration:underline;}
}
</style>
 <div class="abtlikebox" style="">
     <div>
     <iframe src="http://www.facebook.com/plugins/
likebox.php?href=http%3A%2F%2Ffacebook.com%2Fallbloggingtips
 &amp;width=245&amp;colorscheme=light&amp;show_faces=true&amp;border_color=
white&amp;connections=9&amp;stream=false&amp;header=false&amp;height=270"
 scrolling="no" frameborder="0" scrolling="no" style="border: white; overflow:
 hidden; height: 270px; width: 245px;background:#fafafa;"></iframe><span>Widget by
 :<a href="http://www.AllBloggingTips.com"> All Blogging Tips</a></span>
     </div>
 </div>
----------------------------------------------------------------------------------
5. Click on Save button and done !
Note:-
Replace allbloggingtips With Your Facebook Page URL or User name.
 
Read More...

Animated Social Sharing Widget with Cool Hover!

Leave a Comment
 You must have heard about Shareaholic, The Leader in the creation of stylish sharing scripts. After Their Great Success of The Sexy Bookmarks, recently they just have created another awesome design which is known as SassyBookmarks ( Social Sharing Widget ). Here in this post i’ll let you know how to implement SassyBookmarks or Social Sharing Widget on your wordpress and blogger site!
 animated social sharing widgets

 Adding to WordPress!
  • Go To Your dashboard, Then Click On Appearance and then Navigate To Editor.
  • Now on The Right Side you can a list of template files, move your mouse to footer.php and then click on that
  • As Soon the page loads completely, Press CTRL+F and Find </body>
  •  Now be careful and paste the below code just about it !
  • Hit on Update File, Now Visit Your WordPress Blog ! You can see it located on The Bottom Left
------------------------------------------------------------------------------------------------------------

Adding to Blogger/Blogspot!

  • Go to Blogger Dashboard > Template
  • Take a backup of your template.
  • Now find for below code in your template </body>
  • Add below piece of code just above/before of above code
------------------------------------------------------------------------------------------------------------

<!-- Start Social Sharing Widget Sassy Bookmarks HTML (allbloggingtips.com)-->
<div class="shr_ss shr_publisher">

</div>
<!-- End Shareaholic Sassy Bookmarks HTML -->
<!-- Start Shareaholic Sassy Bookmarks settings -->
<script type="text/javascript">
  var SHRSS_Settings = {"shr_ss":{"src":"//dtym7iokkjlif.cloudfront.net/media/
downloads/sassybookmark","link":"","service":"5,7,2,313,38,201,88,74","apikey":"
b87f5899d80a5edce8b5e55f58542ef0f","localize":true,"shortener":"bitly","shortener_key":"
","designer_toolTips":true,"tip_bg_color":"black","tip_text_color":"white","viewport":true,"twitter_template"
:"${title} - ${short_link} via @Shareaholic"}};
  </script>
 <!-- End Shareaholic Sassy Bookmarks settings -->
<!-- Start Shareaholic Sassy Bookmarks script -->
<script type="text/javascript">
       (function() {
            var sb = document.createElement("script"); sb.type = "text/javascript";sb.async = true;
            sb.src = ("https:" == document.location.protocol ? "https://dtym7iokkjlif.cloudfront.net" : "http://cdn.shareaholic.com") + "/media/js/jquery.shareaholic-publishers-ss.min.js";
            var s = document.getElementsByTagName("script")[0]; s.parentNode.insertBefore(sb, s);
        })();
        </script>

<!-- End Shareaholic Sassy Bookmarks script -->

--------------------------------------------------------------------------------------------------------------
 Endlines.
Hope You’ve find this implementation interesting. This Social Sharing Widget Code Snippet is a the property of Shareholic so please don’t remove the copyrights ! Peace and Blessing pals
Read More...

Lock Your Folders !

Leave a Comment

You can lock and unlock your folder with this simple trick !
Procedure :1. Make a folder on the desktop and name it as "folder"
2. Now, open notepad and write ren folder folder.{21EC2020-3AEA-1069-A2DD-08002B30309D} and now (Notepad Menu) File>save as.
3. In the 'save as' name it as lock.bat and click save ! (Save it on Desktop)
4. Now, again open notepad again and write ren folder.{21EC2020-3AEA-1069-A2DD-08002B30309D} folder and now (Notepad Menu) File>save as.
5. In the 'save as' name it as key.bat and click save ! (Save it on Desktop)
6. Now, double click lock.bat to lock the folder and now if you open your folder, control panel will open up !
7. Now, double click key.bat to open the folder and now if you open your folder, you can access your data inside the folder again !
8. Lock your folder and hide the key.bat somewhere else on your hard disk !
9. Whenever you want to open your folder just paste the key.bat on desktop and open your folder using it !

Simple !
Read More...

Hide Files in Image Files !!!

Leave a Comment


Sometimes we are eager to hide some files on the system !!!
(I won't ask Why ???)

http://pcremix.blogspot.com/
So, now i have got a trick to hide files in image files !!!
Here it is :

** You require WinRAR installed on your PC for this trick.
** First add your files to .rar and i.e. say files.rar
** Say you have a image as img.jpg** Now, save files.rar and img.jpg in c:\ drive.
** Click start >> Run** Type cmd** Now in command prompt type cd..** Again type cd..** Type copy /b img.jpg + files.rar new.jpg

-------------- Please Note --------------
>> This command will concatenate the two files into the new file new.jpg
>> Don't type files.rar + img.jpg instead of img.jpg + files.rar.
>> Now, (size of new.jpg) = (size of img.jpg) + (size of files.rar) .

---------------------------
----------------


*** Mission Accomplished !!! ***

Now, we have new.jpg consisting of both img.jpg and files.rar .

Accessing the files :
** Double click new.jpg and img.jpg can be viewed.

** Now, to access files.rar :
# Right click on new.jpg >> Select Open With >> Choose Program...
# Select WinRAR archiver.
#
Now, simply Extract your files !
Read More...

Fake virus !

Leave a Comment
This is a simple program that will scare your friends easily !
This will not harm your computer at all !

Download the file and have fun !

Download Here
Read More...

Scare Your Friend With Auto Shutdown !

Leave a Comment
Read the following :
1. Right click on desktop>select New>shortcut
2. In the shortcut window type : shutdown -s -t 60 -c "the message you want to display"3. Select Next
4. Name it anything.

Now, double click it !

Scared ???

Nothing happened !

Remedy : 1. Go to start>Run
2. Type : shutdown -a3. Hit Enter

Oh! You are rescued !
Read More...

BLOCK UNWANTED MAILS IN GMAIL

Leave a Comment
want to block some unwanted emails in gmail ?

JUST follow these steps
1. Login to your account
2. At the top-right corner, click on Settings
3. Under Settings, click on Filters
4. You’ll now see an option “Create a new filter“, click on it
5. Now in the Form field enter the email address from which you do not want to receive emails
For ex. you may enter abc@xyz.com in the From field to block all incoming emails from this address. However if you want to block the whole domain then use the following syntax: *@xyz.com. Now all the incoming emails from the domain xyz.com will be blocked.
6. Click on Next Step, select the action you’d like to take on the blocked emails. You may select the option Delete it so that the blocked email is moved to trash. To unblock the email, all you need to do is just delete the filter that you’ve created.
Read More...

MS DOS IN COLOR

Leave a Comment
Are you getting boar with your command prompt (CMD) black color
if yes want to change it with other happening cool colors then here is the tricks for you
To do this follow these steps
1) Click on Start >Run then Type CMD
2) Command Prompt will open.

3) Type "color z"

4) List of numbers of colors will appear...Example: Blue=1

5) So, for changing CMD color to Blue color type:-"color 1"and then press Enter.
Read More...

MATRIX LIKE EFFECT

Leave a Comment
Excellent Trick For Matrix Effect

just follow the steps

1. Open Notepad.
2.Copy the below mentioned text in your notepad file:

@echo off
color 02
:start
echo %random% %random% %random% %random% %random% %random% %random% %random% %random% %random%
goto start

3. Save the file with .bat extension like Mat.bat

it will look like image shown below


AND THEN JUST DOUBLE CLICK ON THIS Mat.bat file and see the magic


Read More...

ttt